Thursday, August 16, 2012

In The Kitchen: The Best Lasagna EVER

Cooking is so easy to do. Anyone can cook. Can you follow a recipe? If you said yes then congratulations you are already on your your way to cooking! Yes, cooking can be of a scientific matter-knowing what tastes and smells compliment one another. It can be possible for everyone. It may come naturally to people like me but some others may struggle, but everything takes practice in life. Some just have to practice more while others work on mastering what skills they already have. Today's recipe is a quick and easy lasagna that everyone will LOVE. Yeah I said it, everyone will love it- trust me.

My mom started making this a few years back and I am now working on mastering this recipe and making it my own. Cooking is all about a recipe, mastering the recipe and working with it, as a guide, and tweeking it and making it your own!

Quick and easy meal the whole family will love!!

So let's get started on this cheesy and veggie explosion of a meal!


Ingredients


  1. 1 10 oz. package of chopped spinach (freezer aisle, thawed, drained) 
  2. 1 egg
  3. 1 15 oz. ricotta cheese
    1. I use Sorrento part-skim
  4. 3-4 cups shredded mozzarella cheese
    1. The amount of cheese depends on how cheesy you want between layers and on top
    2. I personally like to shred my own cheese from a block of cheese (a little over half the block)
  5. 6 lasagna noodles
    1. I use Ronzoni Healthy Harvest Lasagna Noodles
  6. 1 medium zucchini (washed)
    1. Be sure to cut off both ends
    2. I sometimes use two small one since they will be more tender
  7. 1 medium yellow squash (washed)
    1. Cut off both ends
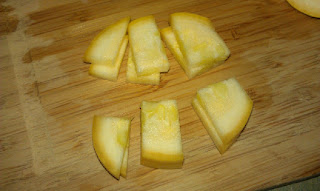
    2. How I cut both the squash and zucchini 
    3. I sometimes use two small one since they will be more tender
  8. 1 small to medium red bell pepper (washed)
  9. 2-3 cloves of garlic (chopped, minced, whatever you prefer)
  10. 1 jar of your favorite pasta sauce
  11. 1-3 oz. tomato paste
    1. This is not necessary but I use it sometimes
  12. 1 lb. (93/7) ground turkey (thawed, drained)
  13. Extra Virgin Olive Oil for noodles, veggies, and browning turkey 
  14. Seasoning for ground turkey, to taste (optional)
    1. Again, this is optional but I use 1 Tbsp.
      1. 1 tsp. oregano
      2. 1 tsp. thyme
      3. 1 tsp. rosemary 

So now that you have your ingredients all ready, it is now time to get to cookin!


The How To

  1. Preheat oven to 350 F
  2. Add Extra Virgin Olive Oil (EVOO) to a skillet, warm it up and brown your turkey
    1. You can add your seasoning here if you choose to do so or opt out of this option.
    2. Be sure to drain it once complete
    3. Set aside once cooked
  3. Cut your veggies as you are waiting for the meat to cook thoroughly 
    1. I chose to cut mine medium width so that they don't take forever to cook and so that they do not get mushy
  4. Chop or mince your garlic cloves and add to your cut veggies. Set aside.
  5. Boil enough water in a pot with EVOO for your lasagna noodles
    1. I do not cook the noodles more than 7-8 min since they will cook a bit once in the oven
    2. Drain noodles and set aside 3 noodles
    3. Take 3 noodles and line the bottom of your dish
  6. Add EVOO to pot that you made noodles
    1. Put your veggies in and saute for a minute 
    2. Add your pasta sauce and stir, put on low heat setting
      1. Here you can add your tomato paste if you wish to
        1. Be sure to taste it to avoid having an overpowering tomato taste
    3. Add the ground turkey to the mixture
  7. Put ricotta cheese into a mixing bowl
  8. Mix one egg with your cheese
    1. It will have a yellow-cream color
    2. Egg/ricotta mix
    3. Be sure to mix it well but not fluff the mixture
  9. Drain your chopped spinach and slowly incorporate into the ricotta cheese and egg mixture
  10. If you did not buy pre-shredded cheese, shred your mozzarella 
    1. Waiting til now will help to prevent the cheese shreds from clumping together
    2. I usually shred my cheese after I chop my veggies and while the turkey is browning since I get those steps completed quickly.
  11. Top your base layer with your pasta sauce mixture
    1. Add about half of the mix and smooth it lightly across the noodles
  12. Take half of your ricotta mixture and top the pasta sauce base
    1. I like to smooth this with the teeth of the fork
    2. Pasta sauce mix topped with ricotta mixture
    3. I use the fork as if I was fluffing the mixture across to spread evenly
  13. Add half of the desired amount of shredded mozzarella cheese
  14. Add your second layer of 3 lasagna noodles
  15. Now repeat steps 11-13
  16. Place the dish in the oven until the mozzarella cheese is melt-y, no more than 10 min
Finished results


Here are some tips when prepping this meal!


  1. Take your knife and cut your bell pepper along where the sections meet. Stop once you hit the core.
    1. Do this on all sections
    2. Pull each section away from the core
      1. Do this for all sections
    3. Now you have no/few seeds and the core comes in one piece
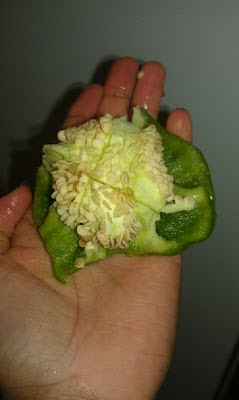
    4. The core comes right out- no fuss!!
    5. Cut your bell pepper with the skin facing your cutting surface for easier cutting 
  2. Cut off the dry ends of each garlic clove for easier peeling
    1. Hit the clove with your knife to break the peel and help make peeling easier too!
  3. Have your ground turkey and spinach thawed and ready to use
  4. I shred my mozzarella because:
    1. It is cheaper. The 8 oz. block cost the price of a regular sized bag of shredded cheese.
    2. It melts better.
      1. All shredded
      2. Companies add potato starch or another ingredient to avoid the shreds from clumping, which in turn alters the way the cheese melts
    3. I use the remainder of the block for cheese squares as a snack with crackers :)
      1. Or for another recipe that requires shredded cheese


The great thing about this or any recipe is that you can make it your own. You can take out or add ingredients to your liking! You can use only veggies, you can substitute the turkey for chicken, pork, tofu or another meat of your liking, the possibilities are endless! Another great thing is that you can wrap individual pieces in Saran Wrap and then place in a big freezer bag for later consumption! Let me know how much you LOVE this recipe. ;)

Sunday, August 5, 2012

First Nail Tutorial: How To- Ikat Nails

Anyone who knows me knows that I LOVE nail polish and doing nail art. I have never posted my results or how-to so I decided there is no better time then the present. Let me know how you enjoy this!!

I was browsing YouTube yesterday because I love to do that to find inspiration for my daily life. I happened to stumbled upon all of these awesome nail tutorials- some that were unnecessary and others that made me go "ahhhhhh" *angels voices*

I came across MissJenFabulous (links at bottom) and found a nail tutorial on Ikat nails. So I watched and fell in love and decided to try it. It just so happened to be time for me to do my nails for the week, eekk!

What I love about this design is that you can get creative with your shapes and your color pallet. Another thing I love is that this looks like it took forever to do but it is super easy. I did this watching a movie so I would be distracted while letting the polish dry in between coats and designs.


Here is a preview of what you will be doing!!
Not too shabby for my first attempt, huh?


Things I Used:


  • Nail file
  • Nail clippers
  • Sally Hansen "Instant Cuticle Remover" Max strength 
  • Cuticle pusher
  • Base and Top coat (Beauty Secrets, from Sally)
  • Nail strengthener (Sally Hansen's "Advanced Hard as Nails")
  • OPI Over the Taupe (base color)
  • "Black Sketch" nail precision nail art brush by Milani
  • OPI "Alpine Snow"
  • "White Canvas" nail precision nail art brush from Milani
  • Sinful Colors "Hazard" (Walgreens or Target)
  • Corrector pen or q-tip with remover 


How to Get the Look...


  1. So as always take the polish off of your nails
    1. Still rub your nails with a moist cotton ball of nail polish remover to the excess oil off the nail
  2. Cut and file your nails- I use a glass nail file for my nails
  3. Apply Sally Hansen "Instant Cuticle Remover" Max strength and push back cuticles 
  4. I then buff and shine my nails
  5. I then apply 1 coat of Sally Hansen's "Advanced Hard as Nails" nail strengthener 
  6. Then I apply my base coat
  7. I applied 3 coats of my base color (OPI Over the Taupe)
  8. Base color
    1. of course drying in between coats
  9. I then applied my black lines with "Black Sketch" nail precision nail art brush by Milani
    1. I started from the nail bed in strokes, making a triangular shape
    2. I then did the top part of the nail in the opposite direction
      1. I would recommend doing all 10 nails in order to give the black a chance to dry so you can continue the process
  10. I then filled in the black area with OPI "Alpine Snow" 
    1. I used "White Canvas" nail precision nail art brush from Milani to fill in any missing spots towards the top of my design
    2. Do this to all 10 nails
    3. I let them dry for an extra few minutes
  11. I then placed a dot of Sinful Colors "Hazard" in the middle of the white of each section of the nail
  12. Fill in any spots that need touching up
  13. Take a correction pen or q-tip with remover to get access polish off skin
  14. Let it dry
  15. Apply your favorite top coat
Right hand
Left hand

Inspiration:

So give this cool nail art design a try and let me know how it works out for you!!

Peace, love and nail polish.

-Asha Monet